

How To Make A Simple Glowing Animation
Make a logo pop similar a neon sign using a combination of layer styles in Adobe Later on Effects.
What you lot'll need
In this project, you lot'll take line art created in Adobe Illustrator and make it look like glowing, flickering tubes of neon confronting a brick wall in After Furnishings using a combination of Outer Glow and Inner Glow layer styles, a unproblematic expression, and the Turbulent Noise effect.
Fix up your layered artwork in Afterwards Effects. Working in the Standard workspace, cull File > Import > File and import your layered Illustrator logo design as Composition - Retain Layer Sizes. Open the comp and cull Composition > Limerick Settings. Gear up a relatively short elapsing in the Settings dialog box (say, 5:00) to save on return time while testing. Precompose each layer separately except for whatever layers that human action in unison, such as the three Centre layers in our example. Grouping-select those before choosing Layer > Pre-compose. Since you'll be making copies of these precomp layers later, give them distinct colors now. Right-click each layer's color fleck and choose a unique color for it from the carte.

A realistic glow requires iii line styles: a broad, feathered outer glow for the illumination effect, some other higher up information technology for a medium-broad glow, and 1 on top of that to simulate the tight, halo-like glow that is brightest in the center of the tube and darkest toward the edge. Drag-select all the precomp layers and indistinguishable them (Edit > Duplicate) twice. Going from height to bottom, append _Tight, _Medium, and _Wide to the grouped layer names. Glows expect all-time against a black solid, so create one (Layer > New > Solid) and place it at the very bottom. Right-click it and select Guide Layer. This ensures yous'll take a black solid for testing purposes that won't exist visible in the last comp when you add the brick wall behind it afterwards.

To add the outer glows, correct-click Body_Wide and choose Layer Styles > Outer Glow from the menu. Aggrandize the Outer Glow settings in the Timeline panel and, post-obit our example, change the values for Blend Mode, Opacity, Color, Spread, and Size. Select that Outer Glow layer style and copy it to the Clipboard (Edit > Copy). Select the other two Body layers, likewise as the other ii Wide layers, and cull Edit > Paste to apply the changes. Click away to deselect all. At that place are as well many copies of the exact same glow, then for Body_Tight, lower the Outer Glow size substantially (endeavour fifteen) and for Body_Medium, reduce the size by about half (attempt 100). Change the Outer Glow colors for the other Wide layers so they match their respective line fine art colors. Now copy the Outer Glow settings for Body_Tight and Body_Medium and paste them onto the corresponding layers for Eyes and Moon, updating the colors to lucifer.

Now add the inner glows. Right-click Body_Tight and choose Layer Styles > Inner Glow. Aggrandize the Inner Glow settings in the Timeline console and, following our example, change the values for Blend Way, Opacity, Color (FFFFFF), Source, Asphyxiate, and Size. Apply that line manner to all Tight layers. It looks ameliorate if Moon_Tight uses a Alloy Mode of Linear Dodge and a lower opacity. Adjust whatsoever inner or outer glows until y'all are happy with the results. Preview at Total Resolution to run into the glows accurately.

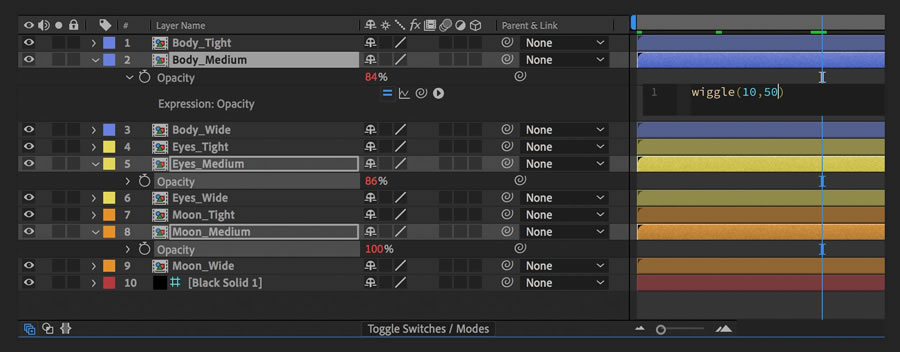
Permit's make the neon flicker. Selection whatsoever Medium layer and display the Opacity setting (printing T). Option/Alt-click the Opacity stopwatch. In the Expression field, replace "transform.opacity" with jerk(50,x) and so click away. Copy that Opacity setting to the Clipboard and paste it on the other 2 Medium layers. As you scrub the playhead, see how the ruby Opacity value constantly changes, causing the slight flickering effect.
A subtle neon plasma effect enhances the look. Open the Moon precomp and drag the Turbulent Dissonance effect from the Furnishings & Presets panel to the Moon layer. Following our example, alter the values for Fractal Type, Effulgence, Complication, Opacity, and Blending Way. Motion the playhead to the start of the comp and set up a keyframe for Evolution. Movement to the terminate and set a keyframe for Development at 36 revolutions (and zero degrees). Preview to see the slight oscillating neon plasma effect added. Deselect the layer, select it again, and copy the Turbulent Dissonance consequence to the Clipboard. Open up the other precomps, prepare the playhead at zero, and paste the effect. For the multilayered Optics precomp, drag-select each layer before pasting the effect. The Opacity setting copied over from the yellow may be too much for other colors. Lower the opacity for the blue (try 15%).

Neon signs expect great on a blackness background, but they often announced against a brick wall. To composite your sign in front of a wall, right-click your primary logo comp and choose New Limerick from Pick. Duplicate the layer in the new comp and set the Blending Fashion of the lower i to Linear Light and Opacity to 50%. Create a new black solid layer and place it at the bottom of the comp. Import the brick wall image, drag it but above the blackness solid, and duplicate it. Set the upper wall layer'due south Track Matte to Alpha Matte and reference the logo layer above it. This automatically turns visibility for that logo layer off, so click the eyeball to restore its visibility. The wall is as well saturated, so lower the bottom wall layer's opacity accordingly (try 10%).

Adding more than neon elements to your sign is as simple as importing the artwork, adding it to your master logo comp, and applying the glow, flickering, and neon plasma effects. If your new artwork uses thinner lines, reduce the Inner Glow size. If the Outer Glow on your artwork looks flat, increase the Range setting slightly. This controls the slope between the core and outer edges of the glow. Finally, give your sign some personality by turning a neon chemical element briefly off or on in its precomp. For case, you could open the Eyes precomp and trim the Correct Heart Top layer to a couple dozen frames so the right eye winks rather than remaining lit. Effort to make the moon briefly turn off.
With Adobe Stock, you have admission to more than than 100 1000000 high-quality, royalty-free images including photos, graphics, videos, and templates to spring-first your creative projects. Effort Adobe Stock and get 10 gratis images.
Source: https://helpx.adobe.com/after-effects/how-to/neon-glow-effect.html
Posted by: pragertharsen.blogspot.com
0 Response to "How To Make A Simple Glowing Animation"
Post a Comment